Serial Debugging
Introduction
One of the most confusing things for developers coming from Arduino is the fact that serial output is not well defined. In the Arduino ecosystem, debugging is mostly done by printing stuff on the serial console.
On STM32s, debugging is usually done using in-circuit debugging (using an ST-Link or similar device), and a serial console is often not needed. There are however multiple ways a serial console can be implemented, either using an UART or a virtual serial port via USB.
Debug Macro
In order to be able to switch debug on and off, I often rely on a macro:
/* Private defines -----------------------------------------------------------*/
/* USER CODE BEGIN Private defines */

#ifdef DEBUG
#define DBG(...)    printf(__VA_ARGS__);\
                    printf("\n");
#else
#define DBG(...)
#endif

/* USER CODE END Private defines */
Using this macro, debug statements can be issued like:
DBG("We reached.....");
But if DEBUG is not defined, the statements will simply not be included in the build (saving potentially a lot of flash).
U(S)ART Serial
/* Private user code ---------------------------------------------------------*/
/* USER CODE BEGIN 0 */

// Send printf to uart1
int _write(int fd, char* ptr, int len) {
  HAL_StatusTypeDef hstatus;

  if (fd == 1 || fd == 2) {
    hstatus = HAL_UART_Transmit(&huart1, (uint8_t *) ptr, len, HAL_MAX_DELAY);
    if (hstatus == HAL_OK)
      return len;
    else
      return -1;
  }
  return -1;
}

/* USER CODE END 0 */
Virtual COM port over USB
Creating and using a virtual COM port over USB is really easy (provided the USB port is not used for anything else).
First step is to enable USB in device mode under Connectivity in STM32CubeMX:
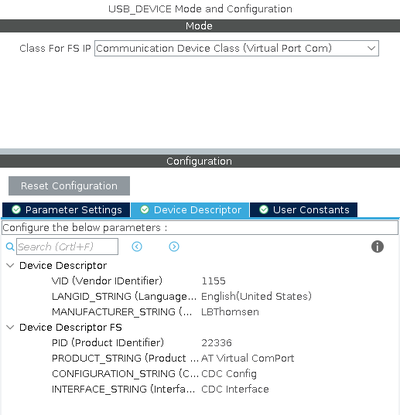
Next, set the USB Device Middleware to Communication Device Class:
Generating code and the device should now show up as a virtual COM port.
Final step is to redirect output from "printf" to go to this virtual COM port rather than one of the UARTS. Unlike using an UART, it is essential to verify that the data has in fact been transmitted before trying again.
int _write(int file, char *ptr, int len) {
	uint8_t status;
	while((status = CDC_Transmit_HS((uint8_t*) ptr, len)) != HAL_OK) {
		if (status == HAL_ERROR) return 0; // Should prevent "hanging"
	}
    return len;
}
You can now use printf to print debugging statements - for example:
uint32_t then = 0, now = 0;

while (1) {

	now = HAL_GetTick();
	if (now % 1000 == 0 && now != then) {

		printf("Tick (now = %lu)\n", now / 1000);

		then = now;

	}
}
The above "while" loop result in the following output on the virtual serial port:
lth@ncpws04:~$ microcom -f -s 921600 -p /dev/ttyACM0
connected to /dev/ttyACM0
Escape character: Ctrl-\
Type the escape character to get to the prompt.
Tick (now = 1)
Tick (now = 2)
Tick (now = 3)
Tick (now = 4)
Tick (now = 5)
Tick (now = 6)
...
Notice the virtual com port can automatically adjust to a number of different speed settings. Above setting of 921600 appears to be around the max.

