Difference between revisions of "STM32 LED Pulse"
| (5 intermediate revisions by the same user not shown) | |||
| Line 1: | Line 1: | ||
| − | [[Category:C]] [[Category:STM32 Development]] [[Category:STM32CubeMX]] [[Category:STM32CubeIde]] [[Category:Embedded]] [[Category:STM32]] {{metadesc|Pulse a LED using STM32}} | + | [[Category:C]] [[Category:STM32 Development]] [[Category:STM32CubeMX]] [[Category:STM32CubeIde]] [[Category:Embedded]] [[Category:STM32]] {{metadesc|Pulse a LED using STM32 timer and interrupt}} |
Imagine you had the requirement to turn on a [[LED]] for a specific length of time at the press of a button (or some other event). | Imagine you had the requirement to turn on a [[LED]] for a specific length of time at the press of a button (or some other event). | ||
| Line 5: | Line 5: | ||
<pre> | <pre> | ||
| + | // Warning, really idiotic code follows - don't _EVER_ do this! | ||
void HAL_GPIO_EXTI_Callback(uint16_t GPIO_Pin) { | void HAL_GPIO_EXTI_Callback(uint16_t GPIO_Pin) { | ||
if (GPIO_Pin == BTN_Pin) // If the button | if (GPIO_Pin == BTN_Pin) // If the button | ||
| Line 19: | Line 20: | ||
It should be equally obvious why this is a really piss poor idea. The function will block for half a second, leaving the processor unable to do anything else for that period. | It should be equally obvious why this is a really piss poor idea. The function will block for half a second, leaving the processor unable to do anything else for that period. | ||
| − | A '''much''' better idea would be to use a timer (of which most [[ | + | A '''much''' better idea would be to use a timer (of which most [[STM32]] processors have quite a lot) to handle the delay. |
First, let us configure a timer for this use. | First, let us configure a timer for this use. | ||
| − | [[File:One shot timer.png| | + | [[File:One shot timer.png|600px]] |
In this example, the timer clock is 100 MHz. | In this example, the timer clock is 100 MHz. | ||
| − | [[File:Timer clock.png| | + | [[File:Timer clock.png|600px]] |
And the User Variables LED_PRE and LED_CNT are configured like this: | And the User Variables LED_PRE and LED_CNT are configured like this: | ||
| − | [[File:User Constants.png| | + | [[File:User Constants.png|600px]] |
In other words, once started, the timer should count down from 9999 to 0 at a frequency of 100 MHz / 10000 = 10 kHz (10000 per second). Since the LED_CNT is set to 9999, the timer will run for exactly 1 second and then fire an interrupt. | In other words, once started, the timer should count down from 9999 to 0 at a frequency of 100 MHz / 10000 = 10 kHz (10000 per second). Since the LED_CNT is set to 9999, the timer will run for exactly 1 second and then fire an interrupt. | ||
| Line 54: | Line 55: | ||
if (__HAL_TIM_GET_COUNTER(&htim5) == LED_CNT) { // Check if Timer is running - sort of | if (__HAL_TIM_GET_COUNTER(&htim5) == LED_CNT) { // Check if Timer is running - sort of | ||
| − | HAL_TIM_Base_Start_IT(&htim5); // | + | HAL_TIM_Base_Start_IT(&htim5); // Timer is NOT running - start it |
} else { | } else { | ||
| − | __HAL_TIM_SET_COUNTER(&htim5, LED_CNT); // | + | __HAL_TIM_SET_COUNTER(&htim5, LED_CNT); // Timer IS running - reset it |
} | } | ||
} | } | ||
Latest revision as of 11:45, 14 May 2022
Imagine you had the requirement to turn on a LED for a specific length of time at the press of a button (or some other event).
Obviously, responding to a button press could be easily handled by an external interrupt, so one could come up with something like:
// Warning, really idiotic code follows - don't _EVER_ do this!
void HAL_GPIO_EXTI_Callback(uint16_t GPIO_Pin) {
    if (GPIO_Pin == BTN_Pin) // If the button
    {

        HAL_GPIO_WritePin(LED_GPIO_Port, LED_Pin, GPIO_PIN_RESET); // Switch LED ON
        HAL_Delay(500); // Wait 500 ms
        HAL_GPIO_WritePin(LED_GPIO_Port, LED_Pin, GPIO_PIN_SET); // Switch LED OFF

    }
}
It should be equally obvious why this is a really piss poor idea. The function will block for half a second, leaving the processor unable to do anything else for that period.
A much better idea would be to use a timer (of which most STM32 processors have quite a lot) to handle the delay.
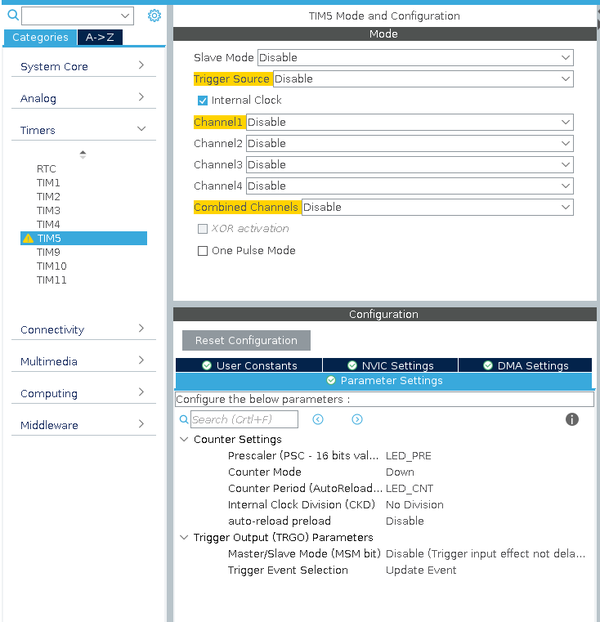
First, let us configure a timer for this use.
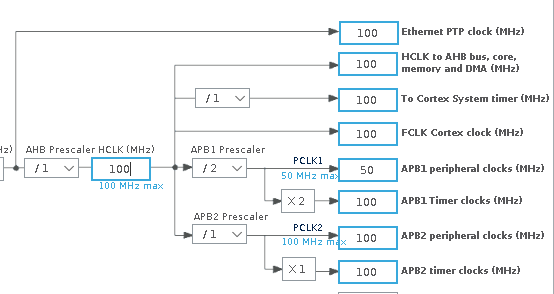
In this example, the timer clock is 100 MHz.
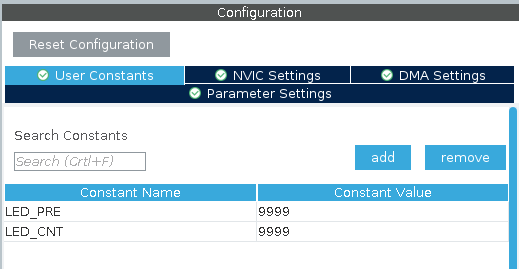
And the User Variables LED_PRE and LED_CNT are configured like this:
In other words, once started, the timer should count down from 9999 to 0 at a frequency of 100 MHz / 10000 = 10 kHz (10000 per second). Since the LED_CNT is set to 9999, the timer will run for exactly 1 second and then fire an interrupt.
We can now improve on the above code:
/* USER CODE BEGIN 0 */

void HAL_TIM_PeriodElapsedCallback(TIM_HandleTypeDef *htim) {
	if (htim->Instance == TIM5) {
		HAL_GPIO_WritePin(LED_GPIO_Port, LED_Pin, GPIO_PIN_SET); // Off LED
		HAL_TIM_Base_Stop(&htim5); // Kill the Timer
	}
}

void HAL_GPIO_EXTI_Callback(uint16_t GPIO_Pin) {
	if (GPIO_Pin == BTN_Pin) // If the button
	{

		HAL_GPIO_WritePin(LED_GPIO_Port, LED_Pin, GPIO_PIN_RESET); // Switch LED ON

		if (__HAL_TIM_GET_COUNTER(&htim5) == LED_CNT) { // Check if Timer is running - sort of
			HAL_TIM_Base_Start_IT(&htim5); // Timer is NOT running - start it
		} else {
			__HAL_TIM_SET_COUNTER(&htim5, LED_CNT); // Timer IS running - reset it
		}
	}
}

/* USER CODE END 0 */
The HAL_TIM_PeriodElapsedCallback is pretty obvious. The button interrupt is a little more complex. We are only using one timer, so we have to check if it is already running and only start the timer if it is not. If the timer is running we simply reset it to a full second again.
And that is about it - no (or very few at least) CPU cycles wasted leaving the processor to do other thing while waiting to switch the LED off.
Source code is in github: https://github.com/lbthomsen/blackpill/tree/master/btnpulse


