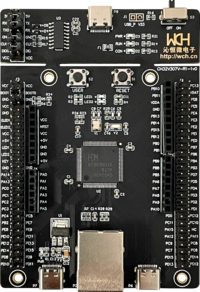
CH32V307V-EVT-R1
The CH32V307V-EVT-R1 is a development board for the CH32V307 RISC-V MCU. This page contains my initial notes on how to work with this board and the CH32V307 MCU. My initial experiments are also on Github here: https://github.com/lbthomsen/CH32V307V-EVT-R1.
As a development board, this one is clearly inspired by ST's Nucleo boards as it includes an Arduino header as well as a built-in flash/debug tool (they call it WCH-Link also inspired by ST-Link).
I never really understood why they (both this one and ST) choose to include an Arduino header. As far as I know, most - if not all - Arduino boards are running at 5V, which makes them possibly incompatible with the 3.3V used on boards such as this.
The CH32V307V-EVT-R1 board itself is readily availble from LCSC at around $12 (+ shipping).
Hardware Description
It is worth noticing that contrary to various ST development boards, the two user LED's and the user button are by default only wired to the header, not the MCU itself. This means that a jumper lead is necessary to use any of these.
MounRiver Studio
Installing
The MounRiver Studio community edition can be downloaded from http://www.mounriver.com/download (warning, insecure link).
Installing it (on Linux) is really quite simple. Unpack the downloaded archive:
lth@ncpws04:~$ tar xvf Downloads/MounRiver_Studio_Community_Linux_x64_V110.tar.xz
After the archive has been unpacked a few tweaks are necessary. MounRiver provided a script for this:
lth@ncpws04:~$ cd MounRiver_Studio_Community_Linux_x64_V110/beforeinstall/
lth@ncpws04:~/MounRiver_Studio_Community_Linux_x64_V110/beforeinstall$ ./start.sh
And that is about it. You can now run MounRiver Studio like this:
lth@ncpws04:~$ ~/MounRiver_Studio_Community_Linux_x64_V110/MRS_Community/MounRiver\ Studio_Community
Creating first project
To be added
Flashing
To be added
Serial console
To be added
Single step debugging
To be added
Getting Started
SysTick Timer
Coming from STM32, I like to have a counter running calibrated at ms resolution (HAL_GetTick() on STM32). By default that is not available on the CH32V307 using the provided SDK. Fortunately it is quite easy to implement:
/*
 * systick.c
 *
 *  Created on: Jun 29, 2022
 *      Author: lth
 */

//#include "ch32v30x.h"
#include "systick.h"

uint32_t uwTick = 0;

/*********************************************************************
 * @fn      SysTick_Handler
 *
 * @brief   This function handles SysTick interrupt.
 *
 * @return  none
 */
__attribute__((interrupt("WCH-Interrupt-fast"))) void SysTick_Handler(void) {
        SysTick->SR=0;
        ++uwTick;
}

/*********************************************************************
 * @fn      Systick_Init
 *
 * @brief   Initializes Systick.
 *
 * @return  none
 */
void Systick_Init(void) {
    /*Configuration interrupt priority*/
    NVIC_InitTypeDef NVIC_InitStructure = {0};
    NVIC_InitStructure.NVIC_IRQChannel = SysTicK_IRQn;
    NVIC_InitStructure.NVIC_IRQChannelPreemptionPriority = 0;//Seeing priority
    NVIC_InitStructure.NVIC_IRQChannelSubPriority = 0;//Response priority
    NVIC_InitStructure.NVIC_IRQChannelCmd = ENABLE;//Enable
    NVIC_Init(&NVIC_InitStructure);

    /*Configuration timer*/
        SysTick->CTLR= 0;
    SysTick->SR  = 0;
    SysTick->CNT = 0;
    SysTick->CMP = SystemCoreClock / 1000; //The latter 1000 represents 1000Hz (that is, 1MS to interrupt once)
    SysTick->CTLR= 0xf;
}

*********************************************************************
 * @fn      GetTick
 *
 * @brief   Get current tick in ms resolution
 *
 * @return  Current tick
 */
uint32_t GetTick() {
        return uwTick;
}
Call the Systick_Init() at the beginning of main and GetTick() will return the number of milliseconds since startup (with wraparound after about 1 1/2 month).
GPIOs
To be added
